Saturday, May 14, 2011

Every Purse Needs A Wallet

 Welcome to my first original project!!! Ok, making a wallet isn't exactly original, but this is my own design. For the first time in my sewing life, I did not follow a tutorial I found on-line. Feel free to praise me. Ok done? Thanks! Now read ahead to see how I put the simple magnificent wallet together!
 

I showed y'all a few days ago the new purse I made. 

{Remember me?}

Can I mention again that I love it?! I really do! It's cute and fun and playful and so me! The only problem is that it is little and my wallet is, well, not. This has never been an issue for this huge-diaper-bag-toting momma, but cute-purse-carrying momma needs a new wallet.

 
I had some fusible interfacing leftover from making the placemat and some fabric leftover from making the purse. I had a few weeks sewing experience and a general idea of what a simple wallet might look like. And I had 30 minutes to kill, so what the hey!

I don't carry a lot with me, so I didn't need anything huge. I needed something small enough for the purse, but large enough to hold my zoo member card, my DL, my debit card, and my insurance card (in order of importance of course - yay zoo!). I also wanted to be able to hold a little bit of cash for when I don't feel like taking the entire envelope system shopping with me (Hi Dave!).

I spent a little time the other day mapping out what I would need to do. I made a sample out of paper so that I could work it out instead of trying to see it in my head. The paper was (of course) 8.5x11 inches, so that's what we're going to start with in fabric! See how I dumb things down for myself?

Supplies Needed:
9.5"x11" fabric
slightly smaller fusible interfacing (I had about an inch on each side, but this isn't necessary)
coordinating thread

The first thing I did was to iron on my fusible interfacing. Just place it in the center of your fabric, cover with a spare cloth (or fabric for your next project, whatever is lying around), and iron. I set the iron down for 10 seconds, lift up and repeat in a different spot until I have covered the whole piece. Then I iron it like normal on both sides. I'm not entirely sure this is "correct" but I can say that it works!


The next thing I did was to make my creases and press them in place. The whole wallet, when complete, will be 3" high.
 

After you get the basic shape pressed, top stitch across what will be become your pockets.

Now fold your wallet in on itself so that the pockets are on the inside and you see a solid piece of fabric. Run Stitch down the raw edges, with a 1/4" (ish) seam allowance.

Flip your wallet inside out and you now have the basic shape! Congratulations! Of course, I wouldn't put any money in the middle there... it might fall out the bottom!

The last step is to fold up the loose raw edge on the bottom. You want to fold this into the middle money pocket we created. Press in place. Now top stitch around the bottom and two sides and you're done! YAY!


I hope you enjoyed my first sewing tutorial! I apologize for the lack of pictures as I went through, but I was making it up as I went and didn't think to take any! If anyone decides to make a wallet using my tutorial, please let me know! Either leave me a comment or send me an e-mail at anestinthemaking {at} gmail {dot} com! I'd *LOVE* to see it!

Wednesday, May 11, 2011

Child's Out-To-Eat Placemat

Hello everyone and happy hump day! I hope y'all are all having a great week!

This evening I finally finished off my second mother's day project! Mother's day in that I bought the fabric with mother's day gift money, not actually mother related at all... but I digress.


Introducing: My first creation for my son, a placemat for when we go out to eat!


I've been itching to make something for the little man for a while now and I'm excited with how well this came out. There were a lot of lessons on the way (did you know bias tape is smaller on one side than the other? You probably did, but I did not), but I am thrilled with the end result. I can't wait until Sunday when we go out to lunch after church so it can make its debut!


I used 2 fabrics from the Circus by L'Miss collection. The pocket fabric came from the remnants bin. The inspiration and tutorial came from Gwenny Penny. Thank you so much Gwen!


I love that it rolls up for easy transportation, and the adorable pocket for utensils!


I'm also thinking about making one for a friend of ours. We are planning to invite them to dinner, and I would like to make a placemat for their daughter!


***Linking up to:***

Tuesday, May 10, 2011

I Made A Purse!

The evolution of my blog stalking went something like this:

February 2010: Little man is born and I spend hours every day nursing him and reading about Susan's amazing journey from giving birth to running a marathon in 1 year. Her blog was recommended to me by a fellow runner on babyfit.com.

October 2010: I am introduced to the world of couponing. I find Hip 2 Save, The Grocery Game (not a blog, but a lifesaver for me), and possibly most importantly Thrifty Decor Chick. That was my jumping off point! For half a year I hopped around the world of decorating on a budget, meal planning, home organization, and crafting. I didn't have the means to do anything (thank you Dave Ramsey for giving me self control), and so I bookmarked. I have page upon page of projects that I would love to try! Some involved sewing, some paitning, some building, some crafting... but they were all things that spoke to me.

April 2011: I discover sewing blogs. Oh-em-gee! My love! Where have you been all my life?! I also borrowed my sewing machine from a friend this month.

May 2011: Oh wait, that's today.

So back in October, or near after, I came across Jaime's gem of a tutorial for her bias tape bag.  I bookmarked it, along with everything else, and went on my way.


Flash forward to this past weekend! For mother's day, I received gift cards to spend at fabric stores and I was in heaven! This is my first time to have more than $5 to spend on fabric at any given time. A quick browse through my saved projects and I knew what I was making...


{Jaime's bag!}


I can not recommend this tutorial enough. The purse it makes is great, and I have gotten so many compliments on it. It was easy enough for me to make, but challenging enough that I felt accomplished (that doesn't necessarily mean it was really challenging... hehe).


{My bag!}

Anyway, I knocked this out Sunday evening. It took a few hours, and I was able to take it to work Monday morning!

I wish I could tell you what fabrics I useds, but I only purchased 1/4 yards of each and when I looked, there's no fabric information on the sides. Both were purchased at Hancock's Fabrics.
I'm going to link this one up a few different places since I'm so darn proud of it! I hope y'all will all go visit Jaime and try out her great tutorial!

{Another of Jaime's bags!}

*LINKY LINKY*

Monday, May 9, 2011

May 1-8: Clothes and Accessories!

 Completed This Week (May 1-8):


 purse <post is coming>


 Painted Lamp {Does anyone know how to make a cute before-after pic using picnik.com?}


 Current Projects:

Travel Placemat for the little one
 - I've purchased my fabric, so I just need to get started.
  * Circus by M’Liss Big Top Acts on Blue Cotton Fabric

Spring Top (tie-top tank) - The top itself is done, but it's held together with giftwrapping ribbon because it's all I had at the time. I need to get out and purchase some purple ribbon. I forgot to take the shirt with me when I hit the fabric stores yesterday, so I'll have to remember to take it along to color match.


Future Projects:

 I'm not sure what's next for me. Obviously finishing up what I've been working on. Then I guess I'll hit the bookmarks or blog-browse until something else catches my fancy. One thing I'm a little tempted by is a runner for our kitchen table. The only caveats are that the table is a hot mess, it's covered in paper and boxes and what-have-you, and I've never had a decorated tablescape before. Still, I'm thinking I *could* do it. No fabric or color choices yet, but it's an idea.


Other Goals:

  *Run more regularly! I was so close to placing in my age group (29 seconds) in this last 5k. I think there's no reason I couldn't speed it up! I want to run more consistently and really push myself.
  *Cook all the veggies we got from the co-op this month. We got a ton of summer squash and zucchini and some bell pepper. I need to cook like crazy this week to keep it all from spoiling!

Mother's Day Recap!

Happy Mother's Day Everyone! I hope you all had a great weekend!

My weekend was an absolute blast! Saturday morning we got up early to go run the Mom Run 5k. I hadn't been feeling 100% (vertigo on Thursday and Friday) and so I didn't want to push myself too hard. I decided to push the little man in his stroller so that Derek could go for a good time.
The course itself was pretty boring. It was an out-and-back, but at least the road did curve. The worst part of the run was not the course itself, but a little interference by a construction crew. A little less than a mile in, there was a helecopter moving beams on a 4-5 story building right next to the course. When I got to it, it moved directly over the road. At this point I was running next to
another lady with a stroller. When we hit the wind coming off of the helecopter we both pretty much stopped. We were running as hard as we could, but we were not making any progress! You could tell how hard we were running, because when we hit
the edge of air stream, we both took off at a full sprint. I'm sure it was hilarious to see us go from 0-50 when we hit that point. We just looked at each other, laughed, and kept going. I did not run the whole course. It has been about a year since I pushed the stroller on a run, and on top of that I hadn't been feeling that great. Honestly, I don't remember the last time I ran 3 miles without having to stop. I did manage to run over half of it, and ran/walked the rest. I was pretty proud of myself. Even my walk was faster though! I knocked 5 minutes off of my time from last year! Derek won his age group though! Ok, there were only 2 of them, but still he won!

{Derek picking up his award for winning his age group!}


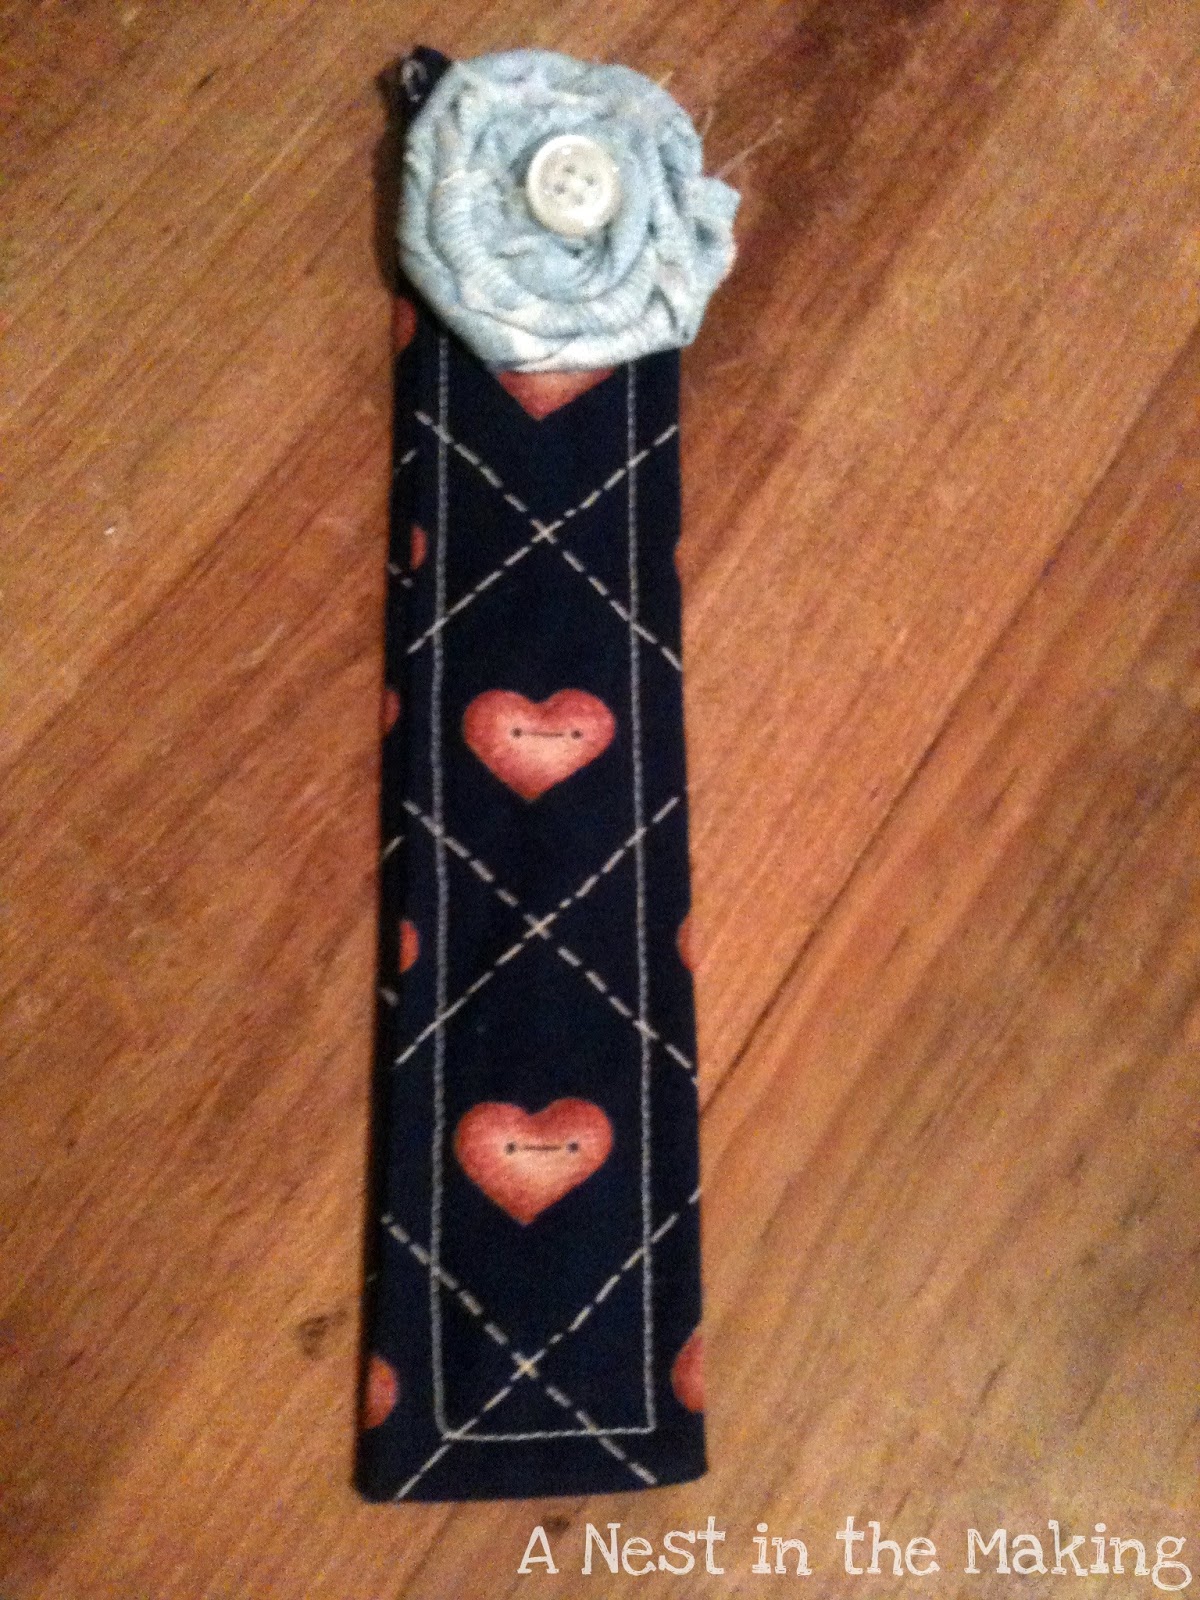
After the race we went out to visit my mom. She left for Florida Sunday morning, so we had our Mother's day festivities a little early. Her gift this year was a bookmark I made. She was pretty impressed, and I'm hoping it's not just because she's my mom!
This is the bookmark I made for her. My mom is a very vibrant, exciting person. I chose the orange flower because the color just reminded me of how bright she is all the time. The flower is done in leopard print because it's fun, just like my mom! And my *favorite* part is the button! It says "Grand Slam" on it! Ok, I did take it from one of Derek's shirts (I love that they always give you an extra), but my mom is the biggest baseball fan and I just found it so fitting!


Sunday morning I awoke to breakfast in bed. All 3 of us piled onto our small bed and ate french toast. Little dude thought this was HILARIOUS! He loves it when we have picnics. They gave me a sweet card (which my little man colored) and a special "allowance" to spend at "the fabric store of my choice."


After church we went to lunch with my in-laws. Derek's mom was excited to receive a bookmark from me as well! And she gave me a giftcard to Joanns! This is the bookmark I made for my mother-in-law. She is more traditional than my mom, and I liked the "cottage" look to this fabric. I can picture her curled up in an arm chair with a good book and this bookmark. It fits the vibe of the scene in my head (does that make me weird or artisitc?).

So after church we headed to the fabric stores. First we hit up Joann's. I got some bias tape for the purse I was making (I knew I wanted black), and a little sewing kit. It has pins, a pin cushion, a tape measure, and scissors (all of which I didn't have). It also came with some more needles and a thimble. The next stop was,
my personal favorite, Hancock's! It felt so weird to *not* be shopping the clearance rack! Don't get me wrong, I definitely looked, but they didn't have anything that jumped out at me. Since I was using gift money, I took the plunge and bought what I wanted! Pretty fabric for my purse {tutorial here} and for the travel place-mat {tutorial here} I'm making! I also got some fusible interfacing (and got to learn what it was), and some bias tape for the placemat.

When we got home sleepy face wouldn't nap, so we hung out and played in the living  room all day. I did get to get my coupons clipped (so I can go shop at lunch on Monday) and my purse pattern cut out. After dinner I got to put together my purse!

All in all it was a great weekend! Very relaxing and fun! I hope everyone else had a magical weekend as well!

*The bookmarks I made used the tutorial here*

Friday, May 6, 2011

A Second Shirt and a Competition!


Guess what I did today! I made another shirt! This time I used the loevely Tie Top Tank tutorial from Nancy at Belle Epoque! It turned out a little big on me, so I took some of the same ribbon I used for the top, and used it as a belt. I love how it turned out! It's super comfy and very light for spring!


I've been reading a lot about The Spring Top Sewalong (direct link in button below) over at Made By Rae. I just uploaded my picture so we'll see how it goes! I'm super excited about getting involved! I doubt I'll win, seeing as this is only the 2nd shirt I've ever made, but I am just happy to have something I think is worthy of being thrown in the mix! So let me take a second to selfishly endorse myself... VOTE FOR ME! Ok, now that's over with, I hope everyone has a great weekend and a happy Mother's Day!


***I'm linking up here:***

Stinkin Cute Thursday Button

make it wear it


Chic on a Shoestring Decorating

Thursday, May 5, 2011

So exciting! - A Shirt Brag Post

 {hi!}

I wore my shirt to work today. I wore it tucked in to a skirt I rarely wear. And paired them with a new (to me) pair of kitten heels. The look is much more stylish than what I typically wear, mostly because the skirt is tucked in and sits at my belly button. I'm more of a safe, sit-on-the-hips kind of girl. But it's been fun to dress up today. I have gotten a lot of compliments. Most of them are on the skirt, but two people stopped me to say how great my outfit was in general. How exciting!? I rarely get complimented like that for what I wear, and to get compliments that encompass my entire outfit, including the shirt I made, is just amazing. I was so scared to put myself out there this morning. I didn't want to tell anyone I made the shirt. I was a little withdrawn and standoff-ish when I first got to work (I'm sure because I was uncomfortable). I was very guarded and scared. I'm an accountant. I'm not known as a creative person. But to put a creation of mine out there, and to have it accepted, and even praised... it's amazing.
I'm sorry for the post without a picture, but I'm playing "single mom" tonight while my dear husband works late, and I just won't be able to get a good shot. I will try to remember to recreate this outfit when my love is home to take the picture for me... maybe on Sunday... what better Mother's Day gift to myself than to wear a shirt I made for myself?!
Sounds like a plan!

***I want to take a second, once again, to thank Kelly for the amazing tutorial! And to thank all of the creative sewing blogs I've so recently come to love, for helping me build up the courage to try!***